Featured

4 principles, we in IT need to be aware of

Sir Isaac Newton revolutionized science and enriched our lives with the laws of motion. Here are similar laws that are as crucial as Newton’s laws which we all “software people” need to be aware of. You might have come across these laws/principles in bits and pieces. My attempt here is to compile them together and describe in the context of the IT/software industry.

The Peter Principle

In a hierarchy, every employee tends to rise to his level of incompetence.

Laurence J. Peter

Peter’s Principle is a concept in management developed by Laurence J. Peter. It says that people in an organizational hierarchy tend to rise to “a level of respective incompetence” eventually. Employees are promoted based on their success in previous jobs until they reach a level at which they are no longer competent, as skills in one job do not translate well to another.

For example, a very skilled software engineer (individual contributor) who excels in a specific programming language might be promoted to a manager position. While great at engineering skills, if he/she lacks the necessary leadership and communications skills, his/her performance might decline in the new role.

Another example could be promoting developers to architect roles based on their coding skills, without considering their design and articulation skills. If someone is an excellent developer, the same person not necessarily would be a good architect.

Moore’s law

Number of transistors in an integrated circuit (IC) doubles approximately every two years.

Gordeon Moore

It was named after Gordon Moore who was a co-founder of Fairchild Semiconductor. It’s not a law of physics, but a long-term trend in technology evolution and as you can see in the graph below, it checks out.

As the number of transistors increases, the cost of computing decreases. This makes high-performance computing more accessible, enabling more businesses to leverage advanced software solutions. The big leap in IoT, cloud, and AI we are witnessing is attributed to the amount of transistors (computing power) that are packed in smaller area.

Count of transistors -> smaller chip size -> cheaper it gets -> smarter/faster compute

Note that while Moore’s Law has held true for more than half a century, it faces considerable challenges as transistor sizes approach atomic scales so it can not decrease further.

Conway’s Law

Organizations that design systems are constrained to produce designs that are copies of their own communication structures.

Melvin Conway

Conway’s Law establishes the link between the composition of organizations and the systems designed by those organizations. It was introduced by Melvin Conway in 1967.

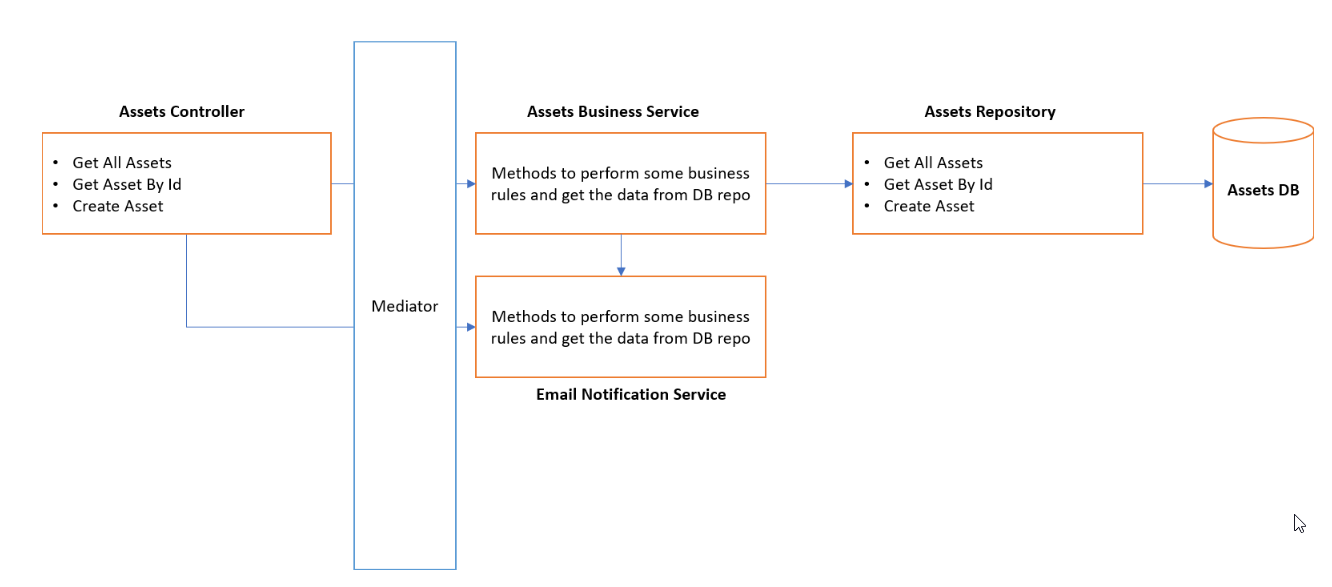
Conway’s Law states that the architecture/ design of a system typically reflects the organization of the team that built it. This is because, for a product to work, everybody involved in its design needs to communicate with each other to ensure compatibility across the board. So by the time the product is eventually built, it is nothing but a copy of the organization structure/ hierarchy of the communication structure adopted by that company.

Considering Conway’s Law can help companies make informed decisions about team structures and communication strategies, ultimately leading to more effective architectures. And there is no perfect answer to that. Like many other questions, the answer is “it depends”. Lately, companies seem to organize their workforces in smaller/leaner teams to ensure agility in their delivery process.

As shown in the picture above, organizations that consist of small, lean and distributed teams end up designing their software modular and distributed. Organizations having large teams tend to implement monolithic architectures.

Murphy’s Law

Anything that can go wrong will go wrong (at the worst possible time).

Edward Murphy Jr.

It was named after American aerospace engineer Edward A. Murphy Jr.

In the context of the software industry, Murphy’s Law underlines the importance of anticipating potential problems and building resilient systems. For instance, engineers build error handling and retry mechanisms to ensure that a single error does not result in complete system failure. Engineers designing complex machines or electronics create redundancies in critical components to safeguard against malfunction.

If there’s a bug in the code, it will eventually get you, often at the most inconvenient time. If there’s any chance of data loss, it is bound to happen! If there is a security flaw in your code, it will be misused. This emphasizes the importance of quality assurance, regular backups and robust data recovery strategies. The purpose of Murphy’s Law is not to be negative, but rather to highlight the importance of planning and testing to prevent mistakes.

Murphy’s law highlights one key point: computers do what you tell them to do, not what you want them to do.

Wrapping up

It’s fun to know these laws/ principles that apply to all of us and unknowingly or knowingly affect our lives. Know it, practice it, share it.

Featured

Making Swagger part of your PR

Context

We all know Swagger aka Open API Specifications, don’t we? It is this popular yet open way of describing your REST APIs. In an ideal scenario, developers like to describe their API designfirst. They want to document the API specifications first and then go ahead and implement those. These artifacts (YAML or JSON files) can then be given to consumers of the API who can then generate the client code, and contracts using the given specs. 

Another way of doing it is the code-first approach. In this scenario, you write your code and then using a Nuget package like Swashbuckle.AspNetCore produce the API specs. 

Problem

One (possible) problem with these approaches though is it becomes difficult to validate the specification’s content. How do you ensure that your actual implementation (code) and specifications shared with the consumer are in sync? One way to improve it is to make these generated specifications part of your code. This way, whenever there is even a small change in the contract, you can review the changes during code reviews / pull requests.

Here is a quick trick to make that happen!

Let’s cook!

Step 1: Import a Nuget package

Add a Nuget package Microsoft.Extensions.ApiDescription.Server to your API that allows you to generate the Swagger specification from the code at the compile time.

Step 2: Decorate your project file 

Make sure you add the below lines in the *.csproj of your API project.

<Project Sdk="Microsoft.NET.Sdk.Web">
  <PropertyGroup>
    <TargetFramework>net8.0</TargetFramework>
    
    <!--Add these Lines in *.csproj file-->
    <OpenApiDocumentsDirectory>$(MSBuildProjectDirectory)</OpenApiDocumentsDirectory>
    <OpenApiGenerateDocuments>true</OpenApiGenerateDocuments>    
<OpenApiGenerateDocumentsOnBuild>true</OpenApiGenerateDocumentsOnBuild>
   
    <Nullable>enable</Nullable>
    <ImplicitUsings>enable</ImplicitUsings>
  </PropertyGroup>
..................

Step 3: Ensure that Open API Specifications are added to your project after building.

Build the project and see if the specifications JSON file shows up in the code as shown. By default, the name of the generated specs file is the same as that of your project name.

Wrapping up

Use the Nuget package Microsoft.Extensions.ApiDescription.Server to ensure your Open API Specs are code-reviewed every time you make any change to the contracts. This ensures your code and the API Specs are always in sync and you don’t miss out.

Featured

Site Reliability Engineering (SRE) Primer

Created using Microsoft Designer

You might have heard the terms Site Reliability Engineering or SRE being thrown in the sentences lately. So what is SRE anyway? Here is my attempt to answer a few basic questions about the jargon.

History of SRE

Site Reliability Engineering (SRE) is a group of engineers (just like DevOps or DevSecOps) that sums software engineering with the IT infrastructure and operations to focus on the reliability, performance, and scalability of large-scale software systems. It was first coined at Google. It was conceptualized by Ben Treynor Sloss, who founded the first SRE team at Google in 2003. By 2016, Google had over 1,000 site reliability engineers. The same pattern was followed across the industry by firms like Airbnb, Dropbox, IBM, LinkedIn, Netflix, and Wikimedia successfully.

Now that we know the definition of SRE at a high level – let’s dive into more details!

Various Aspects of SRE

Focus on AutomationSREs use software engineering principles to automate tasks that the SysAdmins traditionally performed manually. Tasks include system management, change management, incident response, and emergency response.
SRE Roles and Reponsibilities o SREs are developers with IT operations experience. They understand both coding and maintenance of large-scale IT environments.
o SREs are expected to spend their time analyzing logs, responding to incidents, and conducting postmortems. The rest of their time is spent on developing code that automates manual tasks.
SRE Sucecss CriteriaWe shall go into more detail later in the blog regarding how to measure the SRE success. Here is a quick introduction to that topic.

o Service Level Indicators (SLIs): Metrics like availability, and latency of the service.
o Service Level Objectives (SLOs): Agreed-upon targets for service level indicators.
o Error Budgets: Maximum allowable time for system failures without violating SLAs.
Typical SRE Taskso Reducing repetitive and inefficient system maintenance
o Developing scalable solutions for complex problems.
o Allowing room for innovation in a stable technological context.
o Designing for and implementing observability.
o Defining, testing, and running an incident management process.
o Ensuring optimal resource allocation (e.g. CPU, Memory and so on).
o Implementing effective change and release management.
A few SRE aspects

While SRE and DevOps are related, there are a few key differences between them, academically speaking.

What is the difference between DevOps and SRE?

SRE is a specific approach to reliability engineering, while DevOps is a broader cultural movement that encompasses collaboration, automation, and continuous improvement. Both aim to enhance software delivery and system reliability, but they emphasize different aspects of the development and operations lifecycle.

Focuso SRE: Primarily focuses on reliability, high availibility, performance, and resiliency.
o DevOps: Focuses on collaboration between development (Dev) and operations (Ops) teams.
Origins o SRE: Was introduced by Google to manage their large-scale services like e.g. Gmail.
o DevOps: Emerged as a cultural movement to address the silos between development and operations.
Responsibilitieso SRE: SREs are primarily software engineers with focus on operations.
o DevOps: DevOps is a collaborative culture that encourages shared responsibilities. DevOps engineers focus on automation, CI/CD, and infrastructure as code.
Metricso SRE: Use Service Level Indicators (SLIs) and Service Level Objectives (SLOs).
o DevOps: Use deployment frequency, lead time, and mean time to recovery.
Tooling o SRE: Focus on observability, incident response, and capacity planning using tools E.g. Prometheus, Application Insights, etc.
o DevOps: Leverages tools for CI/CD, configuration management, and infrastructure automation using tools like E.g. Azure DevOps, Jenkins, Ansible, and Terraform.
Cultureo SRE: Encourages learning from the incidents and consistent monitoring
o DevOps: Promotes collaboration, empathy, and shared responsibility and values continuous learning and experimentation.
DevOps vs SRE

Benefits of SRE

  1. Enhanced Reliability and Performance:
    • SRE promotes a relentless focus on reliability. By continually refining processes and leveraging automation, organizations witness a significant improvement in system reliability and application performance.
  2. Operational Efficiency and Cost Savings:
    • SRE enhances operational efficiency by minimizing downtime and automating tasks.
  3. Efficiency through Automation:
    • By implementing automation, SRE enables organizations to streamline repetitive tasks, reducing the likelihood of human error which accelerates incident resolution and frees up valuable resources to focus on strategic initiatives.
  4. Improved Collaboration and Communication:
    • SRE bridges the gap between development and operations teams. It fosters a culture of collaborationtransparency, and continuous improvement.
  5. Meeting Reliability Targets:
    • SRE ensures that software systems meet specific reliability targets and service level objectives (SLOs).
  6. Customer Satisfaction:
    • Reduced downtime and improved reliability will lead to higher customer satisfaction, user experience and in general increase the trust in the product.

How to measure the success of the SRE team?

Quantifying the success of SRE implementation can be done using relevant metrics and assessing the impact on factors like system reliability, availability performance and overall efficiency.

  1. Using Golden Signals of Monitoring:
    • SRE teams rely upon the 3 golden signals to evaluate system health:
      • Availability: Measure uptime and service accessibility.
      • Performance: Monitor latency and response times.
      • Errors: Track error rates and failures.
  2. Using Service Level Indicators (SLIs), Objectives (SLOs), and Agreements (SLAs):
    • Make sure that clear SLIs that represent critical aspects of service are in place. (e.g., API response time, service error rate).
    • Set SLOs as targets for these SLIs (e.g., 99.9% availability). Ensure that SLOs are aligned with business goals and customer expectations.
  3. Using Error Budgets:
    • An error budget represents the permissible downtime or error rate. Quantify how much of the budget is consumed by production incidents.
  4. Using Utilization Metrics:
    • Ensure correct monitors are in place to capture resource utilization (E.g. CPU, memory, disk, network) to prevent saturation.
  5. Using Change Management Failure Rate:
    • Measure how often changes (deployments, updates) result in the failures.
  6. Using Incident Response Metrics:
    • Evaluate the mean time to detect (MTTD) and the mean time to resolve (MTTR) for production incidents.
  7. Using Workflow Visibility and Collaboration:
    • Assess how well SRE practices encourage collaboration between development, operations, and business teams.

SRE using Microsft Azure

As a Solution Architect aiming to implement Site Reliability Engineering (SRE) principles using Microsoft Azure, here are some patterns and best practices that can be considered:

  1. Retry using exponential backoff pattern: Implements retries for handling transient failures gracefully (e.g., network issues, timeouts).
  2. Circuit Breaker Pattern: Prevents cascading failures by temporarily blocking requests to a failing service.
  3. Health Endpoint Monitoring: Regularly check service health to detect issues early.
  4. Bulkhead Pattern: Isolates components to prevent one failure from affecting others.
  5. Leader Election: Ensures consistent state in distributed systems.
  6. Graceful Shutdown: Handles application/service shutdown without disrupting users.

Closing

This primer’s aim was just to introduce the concept and compile all the basic angles of SRE. Feel free to dig deep and learn/share.

References

It’s what happens when you ask a software engineer to design an operations team!

Organizations need to invest in training or hire experienced SREs

Educate and communicate the benefits of SRE to gain buy-in

Teams work together to ensure reliability and customer satisfaction

Users experience fewer disruptions, leading to increased trust in the service.

Monitor compliance with SLAs to ensure contractual commitments are met.

Featured

CQRS Pattern via MediatR

What is CQRS?

CQRS stands for Command and Query Responsibility Segregation. This pattern is used to separate read operations vs. update operations. Whether CQRS helps with better performance and scalability is a topic for discussion, but one thing is for sure: it helps with the maintainability and readability of the code.

With CQRS, the code looks neat and clean. CQRS allows the read and write workloads to scale independently, and may result in fewer lock contentions.

Situation

Let’s say we want to implement an Assets Service with simple APIs like Get All Assets, Get Asset By Id, and Create Asset (typical simple CRUD operations). Once the asset is created, you want to send an email notification to the back office.

Typically, we implement it using a straightforward pattern as shown in the diagram below.

Implementing Assets service using traditional pattern

Typically, we have an Asset Business Service, and Email Notifications Services and inject these services into the Assets Controller. Assets Repository is injected into Assets Business Service for performing database operations.

This code works, that’s not a problem. But it has a few issues:-

  • Controller and Business Services – although communicating with each other through DI – have a direct dependency on each other. The controller knows about business services.
  • There is a lot going on in the Assets Business Service. That class has a tendency to grow as soon as more APIs are added to the controller.

Mediator Patten

The mediator pattern helps in terms of encapsulating the interactions between various objects. Instead of having two or more objects take a direct dependency on each other, they instead interact with an intermediate object called a mediator.

What if we introduce a mediator between a controller and a business service class as shown in the diagram below? This way a direct dependency between the controller and business service can be resolved.

Implementing Assets Service using the mediator

This solves one problem only though. The problem of the Assets Business Service class growing and becoming a code smell remains. That problem can be solved by using the aforementioned CQRS pattern.

CQRS advocates to differentiate between read operations vs. write operations. With CRQS, read operations are called Queries, and write operations are referred to as Commands. So, if I apply this to the Assets Service – Get All Assets and Get Assets are Queries and Create Asset is a command.

How do I implement CQRS via Mediator pattern in .NET? In walks the topic of this blog – MediatR Nuget package.

MediatR Library

MediatR is an open-source library trying to solve a simple problem of decoupling the in-process sending of messages from handling messages. It is a cross-platform library and supports NetStandard2.0. MediatR supports request/response, commands, queries, notifications, and events, synchronous and async with intelligent dispatching.

So the same Assets Service using MediatoR and CQRS looks like something like this:-

Assets Service using MediatR

As can be seen in the diagram above:-

  • Controller and Business Service do not have direct dependencies. Both of them talk to each other through a mediator (loose coupling)
  • Read operations like Get All Assets and Get Asset By Id have different query classes and respective handler classes
  • Write operation like Create Asset has its own command class and the respective handler
  • Email Notification has it’s own object under Notifications
  • Events, notifications, commands, and queries are good ole’ POCO classes. Handlers are simple and so unit-testable!

Step 1 – Add the MediatR Nuget package to the project

Install-Package MediatR

Step 2 – Add Queries

namespace MediatorDemo.Queries
{
	public record GetAssetsByIdQuery(string assetId) : IRequest<Asset>
	{
	}
}

namespace MediatorDemo.Queries
{
	public class GetAssetsQuery : IRequest<IEnumerable<Asset>>
	{
	}
}

Step 3 – Add Query Handlers

namespace MediatorDemo.Handlers
{
	public class GetAssetsByIdQueryHandler : IRequestHandler<GetAssetsByIdQuery, Asset>
	{
		public async Task<Asset> Handle(GetAssetsByIdQuery request, CancellationToken cancellationToken)
		{
            // Returns the asset by Id by querying the databse repo
			var asset = new Asset() { AssetIdentifier = request.assetId, AssetName = "New Asset", AssetQuantity = 34};
			return asset;
		}
	}
}

namespace MediatorDemo.Handlers
{
	public class GetAssetsQueryHandler : IRequestHandler<GetAssetsQuery, IEnumerable<Asset>>
	{
		public async Task<IEnumerable<Asset>> Handle(GetAssetsQuery request, CancellationToken cancellationToken)
		{
            // dummy code showing return of multiple assets  
			var dummyAssets = new List<Asset>()
			{
				new Asset() { AssetIdentifier = Guid.NewGuid().ToString(), AssetName = "Dental Scanner 1", AssetQuantity = 12 },
				new Asset() { AssetIdentifier = Guid.NewGuid().ToString(), AssetName = "Dental Scanner 2", AssetQuantity = 22 }
			};
			return dummyAssets;
		}
	}
}

Step 4 – Add Commands

namespace MediatorDemo.Commands
{
	public class AddAssetCommand : IRequest<Asset>
	{
	}
}

Step 5 – Add Command Handlers

namespace MediatorDemo.Handlers
{
	public class AddAssetCommandHandler : IRequestHandler<AddAssetCommand, Asset>
	{
		public Task<Asset> Handle(AddAssetCommand request, CancellationToken cancellationToken)
		{
			//Add asset to the database 
			throw new NotImplementedException();
		}
	}
}

Step 6 – Add Notifications

namespace MediatorDemo.Notifications
{
	public record NewAssetAddedNotification(Asset asset) : INotification
	{
	}
}

Step 7 – Add Notification Handlers

namespace MediatorDemo.Handlers
{
	public class NewAssetAddedNotificationHandler : INotificationHandler<NewAssetAddedNotification>
	{
		public Task Handle(NewAssetAddedNotification notification, CancellationToken cancellationToken)
		{
			// send email to the back office  
			return Task.CompletedTask;
		}
	}
}

Step 8 – Add Controllers

namespace MediatorDemo.Controllers
{
	[ApiController]
	public class AssetsController : ControllerBase
	{
		IMediator _mediator;
		public AssetsController(IMediator mediator)
		{
			this._mediator = mediator;
		}

		[Route("api/assets")]
		[HttpGet]
		public async Task<ActionResult> GetAssets()
		{
			var assets = await _mediator.Send(new GetAssetsQuery());
			return Ok(assets);
		}

		[Route("api/assets/{assetId}")]
		[HttpGet]
		public async Task<ActionResult> GetAssetsById([FromRoute]string assetId)
		{
			var asset = await _mediator.Send(new GetAssetsByIdQuery(assetId));
			return Ok(asset);
		}

		[HttpPost]
		public async Task<ActionResult> AddAsset([FromRoute] Asset asset)
		{
			await _mediator.Send(new AddAssetCommand());
			await _mediator.Publish(new NewAssetAddedNotification(asset));
			return Ok();
		}
	}
}

Step 9 – Add MediatR using the pipeline

builder.Services.AddMediatR(cfg => {
	cfg.RegisterServicesFromAssembly(typeof(Program).Assembly);
});
  • Note that Commands and Queries have implemented the IRequet interface, while Notifications need to implement the INotification interface.
  • Here, I am demonstrating only one notification, but the important thing to note is there can be multiple event handlers available for one event. (Kind of like having multiple Subscriptions for one Topic.). When an event fires – all event handlers are invoked one after the other.
  • Note that notifications have the Publish() method and commands/queries have the Send() method.

Conclusion

CQRS provides a good separation of concerns at the code level. Mediator pattern helps implement loose coupling between various objects. MediatR is the best bate to implement simple queries, commands, and notifications in. NET. Let’s go rock some clean code!

Featured

Introducing TypeChat for Prompt Engineering

When Anders Hejlsberg talks, you stop in your track and listen! Simple. 

He was recently on Scott Hanselman’s Hanselminutes podcast to talk about a new open-source project that Microsoft is working on called TypeChat.

What is TypeChat?

Large Language Models (LLMs) are being talked about everywhere these days. If you keep the hype aside, it has become apparent that LLMs are here to stay and are here to help businesses (especially the mundane parts of the business). 

We keep on hearing a term called Prompt Engineering. If you write better/specific prompts, decorate those with good examples and hints – chances of getting better responses increase. 

TypeChat helps get well-typed responses from LLMs so that more practical natural language interfaces can be built into the apps.

Anders refers to it as Schema Engineering. It’s not surprising to me that Anders wants to bring well-defined static schemas, and types to the prompts – especially since he was the one who brought types to JavaScript using an extremely successful project called TypeScript

Basically, TypeChat brings more discipline and structure to the Prompt Requests and the responses that we send and get back from the LLMs. 

Why should we care about TypeChat?

Once the types/schemas are defined for a particular business model, TypeChat takes care of the things like:

1. Composing prompts to the LLM using the defined schema, static types

2. Validating the LLM response against the defined schema. If the response doesn’t qualify against the defined schema, repair the non-conforming output through further language model interaction

3. Summarize accurately and confirm that the response aligns with the user intent

TypeChat ensures that the same types and schemas can be used against any LLM. E.g. the same piece of TyepChat can be executed against Llama or any other chat-based Open AI model. So, essentially it is LLM-agnostic. 

TypeChat is being developed just for TypeScript and JavaScript at this moment. But considering it is an open-source project, I am sure support for more languages (E.g. C#, Go, Java, and so on) will come. 

If you want to add a natural language interface to your app – let’s say an Electronics Goods Shop that lets users order using a Chat Bot. In such a scenario, TypeChat lets you clearly define the schema and types (specific to your business domain – Electronic Goods Shop). This helps increase the reliability of the LLM requests, responses and makes the prompt processing almost perfect. E.g. you could create classes, structures, enumerations, and functions to support your domain.

We enjoy advantages like Type Safety with modern languages like C#, Java, and TypeScript. The same principles are applied to the prompts using TypeChat. This way, there are enough type constraints in place that decrease the degree of uncertainty and improve upon the LLM responses.  

Getting started with TypeChat

Let’s see how it works. Here I am going to run a sample code from Microsoft’s GitHub repo. 

I am going to try the restaurant example. This example shows how to capture user intent as a set of nouns but with more complex linguistic input. It also shows how we can create a user intent summary to display to a user. It uses a natural language experience for placing an order with the Order type.

Step 1: Get NPM Package 

First and foremost, get the NPM package for TypeChat if you don’t have it already. This is assuming that you already have node.js installed on your machine. 

npm install typechat

Step 2: Clone the GitHub repo  

Clone the GitHub repo

The Examples folder has all the code you need. It’s under an MIT license so, you are good!

Step 3: Setup environment file 

You need to ensure that you have set up the below 2 environment variables in the .env file.

AZURE_OPENAI_ENDPOINT = https://<Your AzureOpenAI Service Endpoint>.openai.azure.com/openai/deployments/<Your Deployment Name>/chat/completions?api-version=2023-05-15

AZURE_OPENAI_API_KEY = Azure Open AI Key from the Azure Portal

Step 4: Run the sample locally 

Compile the code

npm run build

Run the code 

node .\dist\main.js

Step 5: Test the Restaurant sample

Here are a few examples of prompts I tried and the respective responses I received from the Azure Open AI using TypeChat. Note that I am trying the restaurant example from the aforementioned GitHub repo.

Request:
🍕> I want two large pizzas, one with mushrooms and the other with sausage. 

Response:
1 large pizza with mushrooms
1 large pizza with sausage

Request:
🍕> I want three pizzas, one with mushrooms and the other two with sausages. Make sausage one small and the other ones large.

Response:
1 small pizza with sausage 
1 large pizza with sausage
1 large pizza with mushrooms

Conclusion 

TypeChat is a new kid on the block. It will mature. I am sure (and hope) it will get more love and care from the community and Microsoft. Considering Promts Engineering is becoming a norm, using TypeChat, one can put more structure – using well-defined types and schemas.  

Featured

Batman and Robin of API Testing

We worship our heroes but tend to ignore the sidekick of the hero. We love Batman – but what about Robin?

Let me introduce you to the Batman and Robin of the API Testing! We all know who the Batman of API testing is! Yes, Postman. We will not talk about Postman in this post though (maybe some other time). But let me talk about the second fiddle to Postman i.e. Newman.

To be fair – I didn’t know the existence of Newman until 2 weeks back. My colleague introduced it to me I instantly loved it because of its simplicity.

What is Newman (aka Robin in this post)?

Newman is a command line interface (CLI) for running Postman collections and visualizing the results. Since it’s a command line tool, it can be integrated very naturally with your CI pipelines.

Newman takes Postman collection, and environment JSON files as arguments and can not only run the API tests but can generate beautiful reports as well.

Newman is Open source and all you need is its NPM package.

How do I get it installed on my Windows Machine?

Step 1: Get Node.js

Download and install Node.js on your machine unless you already have it. Newman runs on Node, so it’s a hard dependency. Make sure you are downloading Node.js version 4 or above. You can download Node.js using these steps.

Step 2: Get Newman

Install Newman from NPM from your command line.

C:\Users\girish.r.acharya\Downloads>npm install -g newman

Step 3: Use Newman against the Postman collection you already have

Export the Postman collection as a JSON file at an appropriate path and execute the command as shown below. (In this example, my Postman collection JSON file is at the same path where I am running the Newman) See the magic! It shows a nice summary/report as a response.

Note: Notice how the collection file name is passed as a command line argument to the command using a switch called run.

C:\Users\girish.r.acharya\Downloads>newman run "Newman Demo.postman_collection.json"

Step 4: Get the report as a nicely formatted HTML.

The command below will help output the test results as a nicely formatted HTML file.

C:\Users\girish.r.acharya\Downloads>newman run "Newman Demo.postman_collection.json" -r htmlextra

Note: Notice how an extra switch htmlextra is passed to the command. This will ensure that the output is written to an HTML file instead of showing on the command line.

Note: the HTML file is created in a folder called newman at the same path where your Postman collection JSON file lives.

Step 5:Exploring more arguments/switches

Newman supports a lot of optional arguments. Here are a few that I used and loved:

  1. –environment or -e: Using this switch, you can pass a Postman environment JSON file.
  2. –delay-request: Using this switch, you can introduce some delay between the request execution in milliseconds.
  3. –bail: This flag can be used to tell Newman to stop on a test case error with a status code of 1, which can then be picked up by a CI pipeline.
  4. –suppress-exit-code or -x: By default, Newman exits with a status code of 0 if everything is successful which is perfect from the CI pipeline point of view. But one can use -x or –suppress-exit-code switch to override the default exit code.
C:\Users\girish.r.acharya\Downloads>newman run "Newman Demo.postman_collection.json" -e "Newman Demo.environment.json" -r htmlextra

Obviously, Newman supports more arguments and those can be found here. Feel free to explore.

Don’t forget the ultimate sidecar to your beloved Postman – Newman! Robin deserves your love and care as much as Batman.

Featured

Using Azure Open AI On Your Own Data

Context  

In the previous post about Azure Open AI, I introduced the Azure Open AI Service – which is a scalable, yet secure way of building Open AI-based apps. That post was about building your own service that is trained on the open internet using popular Gen AI models like GPT4.

What if you want to build a ChatGPT-style app, but want to ensure that it operates only against your own data and not the entire internet?

In the recently concluded Build event, Microsoft introduced an ingenious way to target your own data using the power of Open AI Models.

Introduction

While it’s still in the preview, the “Azure OpenAI on your data” capability of Azure Open AI PaaS services enables businesses to run models such as ChatGPT and GPT-4 on their own data.

The best part is – it doesn’t require training or fine-tuning. Using this technique – you are using your own existing data (documents) but are unlocking business advantages applying conversational AI concepts. 

“Azure OpenAI on your data” (yeah, that’s how Microsoft refers to it. I wish there was a better name) is powered by OpenAI’s ChatGPT (gpt-35-turbo) and GPT-4 models, enabling businesses to provide responses based on the prompts. Businesses, their partners and customers can access Azure OpenAI using a REST API or the web-based interface in the Azure OpenAI Studio to create a solution that connects to their data to enable an enhanced chat experience.

Let’s break it down!

Azure Open AI Service working in conjunction with Azure Cognitive Search

As shown in the diagram above:

  • “Azure OpenAI on your data” finds out which data to fetch from the given data source based on the user’s input using the Azure Cognitive Search Index 
  • This data is then transformed and resubmitted as a prompt to the OpenAI model by the retrieved information to the original prompt. Please note that though data is concatenated to the original prompt, the resulting input is still processed by the Open AI model like any other prompt. 
  • Once the prompt is submitted to the model, the model uses this information to provide completion(s).

Data formats and file types

For now “Azure OpenAI on your data” supports various file formats for uploading the user data to the blob storage. File formats that are supported as of now are .txt, .md, .html, .docx, .pptx, PDF, etc.

How to set this up?

Here are the steps that I followed to get it working.

Scenario:

For a demo purpose, I decided to create a Chat GPT Style bot called “Bloggy” that answers questions about my blogs. I downloaded a few of my blogs and created Microsoft Word Files and uploaded these files to a blob container. This could be any partner data you would like to train against. The number of files can be as many as you like. As long the files are in the supported format, it’s going to work.

Step 1: Upload your files to the blob storage

Files uploaded to the Blob Storage Container

Step 2: Create an Azure Cognitive Search Service

Note that you need this to filter the data from the files uploaded as per user’s input query. The output of this is then fed as a prompt to the Open AI model.

Azure Serch Service Created

Step 3: Open AI Service Setup

Once you have the data and search service created, time to create the Azure Open AI Service and configure it further. Creating the Azure Open AI service is already talked about in the previous post.

Once you have the service, go ahead and create a new deployment. Notice that for the deployment, I am using gpt-35-turbo model from Open AI.

Deployment Created

Once you have the deployment successfully created, time for us to link the data from the blob storage to the search index and the Azure Open AI Service.

from Chat Playground -> go to Add Your Own Data

Add your own data
Configure Azure Open AI Service with your own data and search index

Configure the correct Azure Blob Storage and the container where the files (data) are uploaded and the correct Azure Cognitive Search Service, the respective index as shown in the screenshot above.

Ensure to configure a better “System Message” as shown.

Ensure to create a suitable system prompt

If everything is configured correctly, from the playground you will be able to issue prompts and see the results.

Chat responses where the data was found, it also provide citations. Clicking on the citations opens the respective file(s) where the related data context was found.

Here are a few examples:

Found the match in the given data

Below is an example where Azure Open AI Service couldn’t find the response for the given prompt in the context of provided data. Note that it didn’t search for it on the open internet- it remained confined to the data given only.

Didn’t find match in the given data

Conclusion

This feature is in preview (as we speak), so more to come! Using this approach, the power of Open AI models can be applied to a specific data set. This approach doesn’t require a lot of fine-tuning/training.

In this post, I have demonstrated how Azure Open AI service can be set up and configured to use “your data”. The programmability of this (creating your app or using this as REST API) will be discussed in a separate post.

Peace.

Featured

Notifications and Webhooks Simplified!

A programmer walks into a cafe

Scenario 1
“Can I get a latte, please?” programmer asks.
“Sure” the barista replies.
A few minutes later…

“Is it ready?” programmer enquires.
“Coming up in a few.” the barista says.
After a few…

“Good to go now?” programmer is in a hurry.
“There you go!” the barista exclaims.

Scenario 2
A programmer walks into a cafe.
“Can I get a latte, please?” he asks.
“Sure” the barista replies.

A few minutes later…
“Your latte is ready to go! Have a good one.” barista says.

What’s up with Scenario 1?

Which scenario do you prefer as a consumer? The second one, right? Good choice. But why?

That’s because, in the second scenario, the barista notified the programmer as soon as the latte was ready. The programmer wasn’t required to query the status of the latte.
The second scenario is what we call – Push Notifications.

Push is better than Pull. Events-driven notifications are better than polling.

As you can see, the whole communication chain is synchronous and the setup is chatty in Scenario 1. This is classic polling, where every request has one response. The responsibility lies with the consumer to know the latest status of the latte. Such communication pattern tends to consume more resources (CPU Cycles + Memory). This means, if the barista is having a busy day because of traffic- the programmer will have to ask the question multiple times to understand the status of his latte.

Why Scenario 2 is better?

The second diagram looks cleaner in terms of communications. Isn’t it? The programmer is just chilling doing his own thing, and the barista is sending notifications to update him about his latte. So no polling, a less chatty interface, and more importantly communication happens in real time and only when it’s absolutely needed – instead of querying every 2 mins (so fewer resources are being consumed).

Introducing webhooks and notifications

Let’s take this up a notch. Webhook is a modern integration design pattern of bringing multiple systems together using events-driven, asynchronous communications. The idea is that – a system publishes a topic and events related to that topic. Interested parties then subscribe to those events related to a particular topic and write handlers for those events.

So whenever an event related to the subscribed event occurs, the consumer’s event handler is invoked to communicate the latest status.

As shown in the diagram above:

  1. Consumers have a choice to subscribe or unsubscribe to one or more events.
  2. The relationship between consumers and events is many: many.
  3. There could be more than one subscriber to an event. So when Event 1 occurs, both Consumer 1 and Consumer 2 are notified.
  4. Producer keeps a map of who has registered for which event(s). So when an event happens, all the registered subscribers are notified.

Let’s go one more level deep. As per the diagram above, subscribers (or consumers) expose a POST endpoint. Webhook publisher (in this case Bank) – invokes these POST endpoints as soon as the event happens. E.g. when the ACCOUNT_CREDITED event happens, the bank invokes the POST endpoints for Consumer 1 & 2 (since both of them have subscribed for that particular event. Please note the same process will not happen for TRANSFER_FAILED event though, since Consumer 2 has not subscribed for it). How to handle these events and what actions to perform is up to the consumer.

Although webhook is a POST endpoint, webhook payload needs to be lightweight. So only essential event metadata like maybe an event id and consumer id might suffice. This is because, delivering the payload is not the aim, but to convey a notification about the status change is. There is a sutble differnce between an Event and Message. Event is lightweight is intended to deliver a status change, while Message has a payload to deliver.

Securing webhooks

What about authentication on the consumer side though? While there are multiple ways of doing it like: Basic Authentication (classic user id and password) or Token-Based Authentication (JWT tokens) – using hashes in combination with a cryptographic algorithm comes naturally to the webhooks.

  1. A secret key is known by both the webhook producer and consumer.
  2. When sending a webhook, the producer uses this key and a cryptographic algorithm (e.g. HMAC) to create a cryptographic hash of the webhook payload. This is the webhook’s unique signature.
  3. The signature is sent in a custom header along with the webhook request.
  4. When the webhook arrives at the webhook URL, the receiving application takes the webhook payload and uses the secret key and the cryptographic algorithm to calculate the signature.
  5. The calculated signature is then compared with that sent by the producer in the custom header. If there is a match then the request is valid, and if not the webhook is rejected.
    Using this process enables developers to verify the integrity of the webhook payload and the authenticity of the webhook producer.

Latte anybody?

Webhooks are a way of seamlessly integrating systems using simple yet powerful consumer-producer pattern. Probably the best way of sending real-time data, and status from one web application to another in response to specific events. Ensure that you make this communication secure over the wire though.

Peace.

Featured

TL;DR using Azure Open AI Service

Premise

No, I am not talking about Chat GPT or Generative AI in this post. Those topics are already well documented. My intention for this post is to talk about Azure Open AI Service – which is a new managed, platform-as-service offered by Microsoft.


In this post, I am showing how to consume Azure Open AI Service from a development point of view. I am demonstrating how Azure Open AI Service-based application can be created, and how extremely simple it is to use!

Let’s Cook!

Azure Open AI Service is invitations-only and not available in many regions yet (only available in East US, South Central US & West Europe, as of now). It is nothing but a REST API wrapper on top of OpenAI’s language models including the GPT-4, GPT-3, Codex, and DALL-E. These models can be easily adapted to the required business domain scenarios that demand content generation, content summarization, search, and natural language to code translation. Users can access the service through REST APIs, SDKs available for various languages, or by using the web-based interface in the Azure OpenAI Studio.

Certain Keywords that developers need to be familiar with while using Azure Open AI Service are as below:

Prompts & CompletionsAzure Open AI Service provides a simple but powerful text-in, text-out interface to any of the models. User inputs some text as a prompt, and the model generates a text completion that attempts to match whatever context or pattern. With prompt-based models, the user interacts with the model by entering a text prompt, to which the model responds with a text completion
DeploymentsOnce you create an Azure OpenAI Resource, you must deploy a model before you can start making API calls and generating text. This action can be done using the Deployment APIs or one could use a GUI available on the Azure Portal. Deployments allow you to specify the model you wish to use.
Tokens Azure OpenAI processes text by chunking it down into string tokens. Tokens are words. The total number of tokens processed in a given request depends on the length of input, output, and request parameters.
Keywords assocoaited with Azure Open AI service

Various Models available

Azure OpenAI Service model names following a certina naming convention:

[capability]-[family]-[identifier]

Capability : E.g., GPT-3 models uses text, and Codex models use code.

Family : E.g., GPT-3 models include ada, babbage, curie, and davinci.

Identifier : Version identifier

Following are the most popular basic text-based GPT3 models and reasoning which can tell when to use what

AdaFastest model. Can be used for: Parsing text, simple classifications, address correction etc.
BabbageCan be used for moderrate text based classifications, semantic searches.
CurieUsed for language translation, complex classification, text sentiment, summarization.
DavinciMost sophisticated. Used for complex intent, cause and effect, content summarization.
Various GPT3 models

Let’s play!

I am a C# developer, so I was eagerly waiting to be able to program using Visual Studio, C# (my power tool of choice). And the wait is over. While Azure Open AI can be called as any REST API using HttpClient, my recommendation is to use the SDK/.NET Client created for the API.

Step 1 : Get access to Azure Open AI Service using this link (as of now, it’s by invitations only)

Step 2 : Once you have the access – create a new Azure Open AI Service resource using CLI or Azure Portal. Please note it’s available only in a certain set of regions.

Step 3: Grab the keys/credentials, and endpoint from the Azure Portal. Please take a note that “Azure OpenAI Studio” – which is a web-based tool you can open directly from the Azure portal to play/test and interact with your deployments.

Step 3: Once you have the resource, next thing you want to do is create a depoyment and grab the deployment name. While creating the deployment, you need to chose which model you want to use. Here I am using, text-davinci-03 model.

TL;DR Service

Here I am showcasing a simple, reusable service that gets a large string as an input talking about a certain topic and then use Azure Open AI Service to summarize it using Azure Open AI Service.

While GPT is capable of content generation, content summarization, search, and natural language to code translation etc. here I am showing content summarization aspect.

Here is how the code looks like:

namespace TLDRService
{
    // Encapsulate the setting and configuration 
	public class AzureOpenAIServiceConfiguration
	{
		//Azure Open AI Deployment Name
		public string DeploymentName { get; set; }

		//Azure Open AI Resource Key
		public string Credential { get; set; }

		//Azure Open AI Resource Endpoint
		public string Endpoint { get; set; }
	}

	public class TLDRService
	{
		private readonly AzureOpenAIServiceConfiguration azureOpenAIServiceConfiguration;

		public TLDRService(AzureOpenAIServiceConfiguration azureOpenAIServiceConfiguration) 
		{
			this.azureOpenAIServiceConfiguration = azureOpenAIServiceConfiguration;
		}

		public string GetTLDR(string messageToBeSummarized)
		{
			OpenAIClient client = new(new Uri(this.azureOpenAIServiceConfiguration.Endpoint), new AzureKeyCredential(this.azureOpenAIServiceConfiguration.Credential));

			var completionsOptions = new CompletionsOptions()
			{
				Prompts = { ConvertToBasicPrompt(messageToBeSummarized) },
				MaxTokens = 250 // hard coded for now, can come from config
			};

			var completionsResponse = client.GetCompletions(this.azureOpenAIServiceConfiguration.DeploymentName, completionsOptions);
			return completionsResponse.Value.Choices[0].Text;
		}

		/// <summary>
		/// Create a prompt for given message
		/// </summary>
		/// <param name="message"></param>
		/// <returns></returns>
		private string ConvertToBasicPrompt(string message)
		{
			return @$"
											Summarize the following text.

											Text:
											""""""
											{message}
											""""""

											Summary:";
		}
	}
}

I wrote a tiny Windows app client to test the service and it works like a charm.

Conslusion

Azure Open AI Service is a managed, platform-as-a-service just like any other Azure service with performance, ease of use, security, and scalability. It provides a perfect abstraction layer to use Open AI models. So, as a developer – you just get to focus on the scenario you are implementing and leave all the complexities to Microsoft Azure which we know and love.

Featured

Project “Indigo” Reloaded

Some History to start with

Who remembers Code Name “Indigo”? I do.

Who remembers Don Box talking about SOAP, while being in a soap bubble bath on the stage in TechEd 2001? I do.

I have seen, used, and made my bread using Windows Communications Foundation (popularly known as WCF – pronounced as DubSeeEff). Good ol’ days that some of my old friends might remember.

WCF is not supported in its purest form anymore. The current .NET (aka .NET Core) doesn’t support it. And rightly so! WCF was over-architected and bloated. It introduced SOAP envelopes that tend to become large in size and hence not great for performance. Obviously, with the advent of REST, HTTP and lightweight APIs serving data to all sorts of devices, WCF/SOAP was always going to be an afterthought.

But there is still a lot of WCF out there. Especially as the Enterprise software. And if you want to bring that to the new and shiny .NET – there was no inbuilt support for that. There was no migration path available, until now. This could be because WCF takes a lot of dependencies on Windows and .NET Core is supposed to be OS-independent.

Let’s cook!

Knight in shining armour is CoreWCF.

CoreWCF is an open-source project which is nothing but a port of WCF to the .NET Core. It provides a compatible implementation of SOAP, NetTCP, and WSDL using ASP.NET Core as the service host.

It is compatible with .NET Standard 2.0 so it works with pretty much all .NET Core versions.

It supports a lot of features that we know and love :-

Features supported by CoreWCF

  • Http & NetTCP transports
  • BasicHttpBinding, NetHttpBinding, WebHttpBinding, WSHttpBinding
  • Certificate & Windows authentication
  • WS Federation
  • WSDL Generation
  • Configuration support including services & endpoints

Please note that CoreWCF does not support full-blown WCF. It is nothing but a stripped-down version of WCF. So certain features like MesageQueus etc. are not supported.

Let’s build a WCF Service using BasicHTTPBindings using .NET Core 6.0

Note : My idea is not to talk a lot about WCF here. This blog assumes you already know WCF. I am just attempting to show how to compile and run WCF is .NET Core 6.0 using CoreWCF.

All you need is 2 Nuget packages.

<PackageReference Include="CoreWCF.Http" Version="1.3.1" />
<PackageReference Include="CoreWCF.Primitives" Version="1.3.1" />

Let’s set up some extremely basic Data Contracts, Service Contracts, and Fault contracts and build a Hello World WCF Service.

    [DataContract]
	public class EchoFault
	{
		[AllowNull]
		private string message;

		[DataMember]
		[AllowNull]
		public string Greeting
		{
			get { return message; }
			set { message = value; }
		}
	}

	[ServiceContract]
	public interface IHelloService
	{
		[OperationContract]
		string Hello(string message);

		[OperationContract]
		string HelloWithContract(EchoMessage message);

		[OperationContract]
		[FaultContract(typeof(EchoFault))]
		string FailHello(string message);
	}

	[DataContract]
	public class EchoMessage
	{
		[AllowNull]
		[DataMember]
		public string Greeting { get; set; }
	}

	public class HelloService : IHelloService
	{
		public HelloService()
		{ 
		}

		public string Hello(string message)
		{
			return message;
		}

		public string HelloWithContract(EchoMessage message)
		{
			return message.Greeting;
		}

		public string FailHello(string message)
			=> throw new FaultException<EchoFault>(new EchoFault() { Greeting = "WCF Fault OK" }, new FaultReason("FailReason"));
	}

Once the basic contracts are setup, it’s time to host this service using .NET 6.0 using ASP.NET Core as a host. Below code goes in Program.cs

var builder = WebApplication.CreateBuilder(args);

builder.WebHost.ConfigureKestrel((context, options) =>
{
	options.AllowSynchronousIO = true;
});

// Add WSDL support
builder.Services.AddServiceModelServices().AddServiceModelMetadata();
builder.Services.AddSingleton<IServiceBehavior, UseRequestHeadersForMetadataAddressBehavior>();
// Add service
builder.Services.AddScoped<IHelloService, HelloService>();

// Setup basic authntication
builder.Services.AddAuthentication(options =>
{
	options.DefaultAuthenticateScheme = "Bearer";
	options.DefaultScheme = options.DefaultAuthenticateScheme;
	options.RequireAuthenticatedSignIn = false;
});

var app = builder.Build();

// Add Basic HTTP Binding
app.UseServiceModel(builder =>
{
	_ = builder.AddService<HelloService>((serviceOptions) => { })
	// Add an endpoint using BasicHttpBinding
	.AddServiceEndpoint<HelloService, IHelloService>(new BasicHttpBinding(), "/HelloService/basichttp")
	// Add an endpoint using WSHttpBinding
	.AddServiceEndpoint<HelloService, IHelloService>(new WSHttpBinding(SecurityMode.Transport), "/HelloService/WSHttps");
});

var serviceMetadataBehavior = app.Services.GetRequiredService<ServiceMetadataBehavior>();
serviceMetadataBehavior.HttpGetEnabled = true;

app.Run();

Add below to the appsettings.json which will setup URLs for your HTTP and HTTPS endpoints

  "Urls": "http://localhost:5000;https://localhost:5001"

Once successfully hosted – open https://localhost:5001/HelloService/WSHttps to see the home page of your service.

Open http://localhost:5000/HelloService/basichttp?wsdl to see WSDL of your service.

Conlusion

Let me make it absolutely clear. I am not advocating using WCF for greenfield APIs at all. Go for HTTP/REST which is the best in that scenario! I am talking about proving an intermediate migration path to make old WCF work with .NET Core.

StackOverflow Developer’s Survey 2022

Preface

Every year Satckoverflow conducts a survey to find out the trends in the industry from the developer’s point of view. Every year it is a fascinating read. Recently came across a 2022 survey and the results are really interesting.

They interviewed 70K developers from different countries, ages, backgrounds and technologies. For a full read, take a look at this link. I am just sharing a few results from that survey that I found interesting.

Programming, scripting, and markup languages

The year 2022 was JavaScript’s 10th year in a row as the most used programming language. No surprise there – since JavaScript is the assembly language of the web and we are living in the age of the internet!

Fascinating to see an old language like Python and a modern language like TypeScript side by side – almost tied. C# and Java numbers remain constant as those are probably the most popular languages still used in the enterprise software.

SQL remains the 3rd most popular language. So much for the No-SQL movement! Well, this underscores how much SQL is still out there.

Databases

This year saw PostgreSQL taking over the first place spot from MySQL. As a find, professional developers are more likely to use Redis, PostgreSQL, Microsoft SQL Server, and Elasticsearch.


MongoDB is the second most popular database for those learning to code (behind MySQL). This makes sense since it supports a large number of open-source languages and application development platforms.

Cloud platforms

AWS remains the most used cloud platform by the Professional Developers. Interestingly. Microsoft Azure took the second-place spot from Google Cloud.


In terms of an interesting find, developers who are learning to code are using Heroku more than Azure and AWS. So possibly they are doing POCs in Heroku and doing production deployments in AWS, Azure?!


We can see the inroads that AWS and Azure have with organizations and enterprises – significantly more developers are using those platforms compared to people who are learning to code.

Web frameworks and technologies

No surprise here, Node.js & React.js are the two most popular web technologies among developers.

Fascinating to see a larger number against ASP.NET Core vs classic ASP.NET. It seems the industry has caught up and many developers have taken lead in terms of using more modern . NET.

Other frameworks and libraries

In the year 2022, StackOverflow had additional survey category to see the most popular libraries/platforms.

TensorFlow happens to be more popular than PyTorch for machine learning.

Great to see newer libraries like Flutter and React Native appearing on this list and emerging as the two most popular cross-platform tools.

Integrated development environment (IDEs)

Visual Studio Code remains the most popular and preferred IDE. What a story!

Great to see dinosaurs like Vim, Eclipse and XCode still continue to serve the niche market of developers.

Synchronous tools

This year saw Zoom domination yet again for the meetings, and conferencing. While Microsoft Teams continues to dominate the enterprise scene, but Slack gained a lot of ground among developers this year.

Diversity

These are obviously sample numbers. But these numbers are representative of the industry. Software development/engineering continued to be dominated by white men. And it sucks. 😦 Both of these are indications that the industry could continue to become more diverse as more people join the workforce.

Those learning to code are less likely to identify as European and/or White than Professional Developers. New group of developers who may enter the workforce soon, could be more diverse.

Customizing Cipher Suits for Azure App Service

Problem

I recently came across an interesting problem. We have a public web app hosted using Azure App Service. We decided to perform penetration/security testing for this app. One issue logged was that the app supports certain weaker cypher suits.

Note that app implements TLS 1.2 and has HTTPS Only. (as recommended). So we were wondering that will suffice, but apparently not!

HTTPS Only, TLS Version Setting for a typical web app

Security testing flagged that it supports weaker cypher suits. Screenshot below shows the results from SLL Labs.

Cipher Suits – before implementing the hack

So how to solve this issue for a web app hosted using Azure App Service?

Does the app service support the customization of the TLS at that level?

Does Azure App Service allow to pick and choose which cypher suits are allowed and which are not?

The answer is – big fat no. Not yet!

While searching about options, came across a couple of options from various forums.

Option 1 – Application Gateway/Front Door

Deploy your App Service behind an App Gateway + WAF or Azure Front Door. These components do support customizing the cypher suits. While recommended by the experts for the public web apps, these services are expensive. Also it will have an impact on your network topology, architecture since you need to implement Virtual Network etc.

Option 2 – Application Service Environment

Deploy your web application in the ASE. ASEs also are notoriously expensive. For a single digit requests/day – we were not looking to invest in this mammoth. It was not justifiable.

Option 3 – The Hack

Finally came across this solution. It’s a hack, but gets the job done and is not expensive, complex at all.

So apparently, Azure App Service has a property called minTlsCipherSuite that talks about Minimum TLS Cipher Suite supported. This property is not exposed through the Azure Portal yet, but can be edited using the Azure Source Explorer.

The minimum TLS cipher suite feature comes with a pre-determined list of cipher suites that cannot be reordered nor reprioritized. Since the service is already using the ideal priority order, it is not recommended to reprioritize the the cipher suite order.

We can rather leave the web app exposed if weaker cipher suites are prioritized over the stronger ones. Also one cannot add newer or different cipher suites to the list of supported cipher suites. When a minimum cipher suite is selected, all the cipher suites that are less secure than the selected minimum one would be disabled for the web app. There is no support to make exceptions and to disable only some of the cipher suites that are weaker than the selected minimum cipher suite.

Resource Explorer View

I issued a PATCH request and updated minTlsCipherSuite to TLS_ECDHE_RSA_WITH_AES_128_CBC_SHA. This means the app service will support this suite as minimum and the Open SSL test came back with a less number of weak cipher suits.

Cipher Suits – after implementing the hack

Important Note : Standard App Service Skus do not support this operation. You need to have a App Service Premium Sku.

References

Microsoft Post where I got this idea from

Tool I used for testing the cipher suits

Featured

Introduction to YARP

Prologue

YARP stands for Yet Another Reverse Proxy. Came across this project by Microsoft recently and was quite fascinated to see how simple it is now to implement a configurable, feature-rich reverse proxy using our beloved C#, ASP .NET Core. Apparently, many internal Microsoft teams were building their own reverse proxies, load balancing mechanisms and this project tries to consolidate these approaches.

YARP is a framework for building fast proxy servers in .NET using the infrastructure from ASP.NET. The key differentiator for YARP is that it’s been designed to be easily customized and tweaked to match the specific needs of each deployment scenario.

Considering it is based on HTTP / gRPC – it’s correct to say that YARP based proxies operate at the layer 7 of the OSI stack. It essentially is a ASP.NET middleware that intercepts the incoming requests, terminates SSL and provides a configurable, “code-first” ways to do the load balancing, API gateway style operations.

Why should you care?

While there are a lot of other products that does the same stuff, as a developer you get a better control here. But please note YARP is in it’s early days and might not be ready for the prime time yet. Idea of this post is to introduce to a cool project Microsoft and community is working on that is taking a nice shape.

There are already a lot of implementations of API gateways (API Management Gateway, Azure Front Door are few commercial examples) and reverse proxies available in the market. But there is something special about YARP if you are all in with ASP.NET and if you care about easy customizations, tweaks to match the specific requirements. It supports following features so far:

  • Easy, configuration-based route definitions
  • Pipeline model for extensibility
  • Load-balancing with support for standard and custom algorithms
  • Supports sticky sessions (affinity). Ensures requests from a given client are always sent to a certain server instance
  • Supports transformation rules to modify the requests or the response received
  • Supports authorization and CORS per route

How to add YARP to your project?

As shown in the code below, using the Nuget package called Yarp.ReseverseProxy, a middleware can be added to the ASP.NET pipeline.

Note that while YARP proxy exists in the solutions other controllers can co-exist as well. So not necessarily all the incoming traffic to the server needs to go thru the YARP proxy. (you can pick and choose if that’s what you want)

var builder = WebApplication.CreateBuilder(args);
builder.Services.AddControllers();

//Add ReverseProxy middleware. Ensure to add a Nuget package called Yarp.ReverseProxy

builder.Services.AddReverseProxy().LoadFromConfig(builder.Configuration.GetSection("ReverseProxy"));

var app = builder.Build();
app.MapControllers();
app.MapReverseProxy();
app.Run();

You might have noticed – a part of the code expects a configuration section called “ReverseProxy” to be present in the appsettings.json and this is where the real power of YARP comes in.

 "ReverseProxy": {
    "Routes": {
      "route-strightforward": {
        "ClusterId": "cluster-strightforward",
        "Match": {
          "Path": "{**catch-all}"
        }
      }
    },
    "Clusters": {
      "cluster-strightforward": {
        "Destinations": {
          "destination1": {
            "Address": "https://example.com/"
          }
        }
      }
    }
  }

YARP configuration has 2 main things.

Routes

Specifies a set of routes that matches incoming HTTP requests based on the match criteria and proxies matching requests to the respective cluster

Clusters

Specifies a set of equivalent endpoints and policies.

Above configuration example is saying – for every incoming request to the server, just capture it and forward it to the set of destination(s) – which in this case is https://example.com

To it is essentially doing the basic routing/forwarding. Note that there can be n routes and n clusters, destinations.

"ReverseProxy": {
    "Routes": {
      "route-load-balancing": {
        "ClusterId": "cluster-load-balancing",
        "Match": {
          "Path": "{**catch-all}"
        }
      }
    },
    "Clusters": {
      "LoadBalancingPolicy": "RoundRobin",
      "cluster-load-balancing": {
          "Destinations": {
            "cluster-load-balancing/destination1": {
              "Address": "https://google.com"
            },
            "cluster-load-balancing/destination2": {
              "Address": "https://microsoft.com"
            }
          }
      }
    }
  }

In the above example all the incoming requests will be captured and sent to destinations, but this time it will do the load balancing.

In the example, there are 2 endpoints specified (could be more than 2). Load Balancing policy configured here is Round Robin. (Algorithm is configurable, customizable) This means that in a round robin fashion, the traffic will be distributed between destination 1 and designation 2. Google.com and Microsoft.com are used as examples here, these could be your endpoints or even localhost endpoints.

When no load-balancing method is specified YARP uses PowerOfTwoChoices by default. This algorithm chooses two random destinations and selects the one with the least assigned requests.

 "ReverseProxy": {
    "Routes": {
      "route1": {
        "ClusterId": "cluster1",
        "Match": {
          "Path": "/api/service1/{**catch-all}"
        },
        "Transforms": [
          {
            "PathRemovePrefix": "/api/service1/"
          },
          {
            "ResponseHeader": "Source",
            "Append": "YARP",
            "When": "Success"
          }
        ]
      }
    },
    "Clusters": {
      "cluster1": {
        "LoadBalancingPolicy": "RoundRobin",
        "Destinations": {
          "cluster1/destination1": {
            "Address": "https://google.com"
          },
          "cluster1/destination2": {
            "Address": "https://microsoft.com"
          }
        }
      }
    }
  }

The example above is slightly more advanced. As part of this, all the incoming http traffic to the server will be intercepted, but we are interested only in /api/service1/ path. All calls coming to /api/service1/ path will be transformed and a HTTP response header is added to that when successful.

It’s important to know that – here I have used appsettings.json to configure all the YARP properties, but all of this can be done using code as as well. Also since this is ASP.NET Core – it will be executed the same way on Linux/Windows.

Wrap up

Quite possibly a work in progress and might not be ready for production yet, but the direction in which this project is going is engorging. This could be a quick, secure, customizable, extensible and cheap way for building a proxy servers in your microservices implementation.

References

Simple Throttling Implementation

Introduction

If you are an API developer, you need to be aware of throttling/rate limiting as a concept.

With API gateways that are available these days (E.g. Azure API Management), throttling can be offloaded – while API itself can focus only on the business logic. But in this post, I am going to introduce you (to those who don’t know) to a simple throttling implementation that can be directly done in the API itself. This will work for simple APIs, but for better design and sophisticated policies – the recommendation is to use the API gateway.

Why throttling?

The “Chatty Consumer Syndrome

In a typical API implementation, with no throttling – a certain client can make far too many calls in a quick succession and hog all the resources (CPU, Memory). This will have negative impact on the performance and impact other clients who are calling this API.

Security

Bots/malicious programs can make a lot of calls and try to overwhelm your API by doing DDoS attack. In such scenarios, having a good throttling policy is a must.

Business Requirements

If you are selling your APIs using a consumption model and you want to offer 3 tiers – Bronze (100 calls /minute), Gold (500 calls /minute) and Platinum (1000 calls /minute). Client can purchase these packages and can pay-per-call. In such situations – you must have rate limiting, metering in place to control the billing model.

Let’s Cook!

This post is focused on ASP.NET Core, C#. But I am sure, other technologies will also have something like this. If the platform, language itself is not offering the syntax – feel free to use the API gateway as suggested above.

Here I am using a Nuget package that is tailor-made for ASP.NET Core called AspNetCoreRateLimit. This package once initiated and configured as shown in the sample below can be used to implement a very simple yet configurable throttling policy.

Bootstrapping

builder.Services.AddMemoryCache();
builder.Services.AddSingleton<IRateLimitConfiguration, RateLimitConfiguration>();
builder.Services.AddInMemoryRateLimiting();

builder.Services.Configure<IpRateLimitOptions>(options =>
{
	options.EnableEndpointRateLimiting = true;
	options.StackBlockedRequests = false;
	options.HttpStatusCode = (int)HttpStatusCode.TooManyRequests;
	options.RealIpHeader = "X-Client-IP-Address";
	options.GeneralRules = new List<RateLimitRule>
	{
		new RateLimitRule
		{
			Endpoint = "*", //Throttling applicable to all the endpoints
			Period = "10s", // Duration in which successive calls can be made 
			Limit = 3 // No. of successive calls supported in a window of 10 secs
		}
	};
}); 

// .......................................
app.UseIpRateLimiting();

This piece of the code, configuration will enable throttling for all the endpoints in the API as part of which a certain client with a unique IP address can only make 3 calls in a window of 10 seconds. 4th call in the span of 10 secs will yield into a HTTP 429 exception.

Happy Call

This is how the response looks like after the first call. Call is obeying the policy in this example.

Successful call

Throttled

Once all 3 attempts are exhausted in a 10 secs window – API throws HTTP 429 Too Many Requests error.

Throttled Response
Error message when the API throttles

Conclusion

Having a good throttling policy for the API to regulate the number of calls it is receiving from various consumers is extremely vital for the API’s performance, availability and security.

This post was just to introduce you to the topic and to show you how easily it can be implemented. Go expand and learn it more!

Featured

Houston, we have a problem

Monologue

Apollo 13 is one of my favorite movies. An intriguing story unwinding in space, a lovable protagonist, and a gripping yet nail-biting finish. It has got it all.

One particular scene I love the most though. Yes, it involves the engineers. It involves solving a problem under pressure!

Sounds familiar? Isn’t it like solving a production bug directly into the production environment? Engineers across industries face such firefighting situations all the time. Many times, one can not plan for such disasters ahead of time. You just get the coffee going, gather around a table, collaborate, apply your brains and solve the problem.

The Problem

The three astronauts are forced to go to the Lunar Module because of the explosion in the Command module. But, the Lunar module is not designed for three astronauts. With each breath, the extra astronaut is increasing the CO2 level and overloading the Co2 scrubbers in the Lunar module.

There are plenty of scrubbers for the Command module, but they do not have backups for the Lunar module. Why can’t they just plug the Command module filters into the Lunar module?

They are of different shapes and sizes. The lunar module uses round scrubbers while the Command module uses square ones.

Solution

Engineers gather into a conference room and dump a bunch of hardware onto a table. This is the stuff that is available to the astronauts that the engineers need to use to build a CO2 filter. The goal? Fit a square peg into a round hole.

And they not only build the filters, they narrate the deployment steps to astronauts and it succeeds!

My Takeaways

  • As an engineer we need to solve the problem using whatever limited resources available, without complaining!
  • Use creativity, and ingenuity.
  • In firefighting situations, teamwork is extremely important. It might sound a cliché, but getting that final code review done for the SQL query that you are about to run in production is super-important!
  • Natural leaders typically shine in such situations. Backing each other and showing decision-making by remaining calm is extremely important.
  • Managers need to give enough freedom to their engineers in situations like this. Just stay out of the way and let engineers do their job. Don’t ask stupid questions, and don’t try to postmortem the situation at that time. That will come later.
  • Documenting the hotfix procedure and possibly testing that in some other environment will help. That will boost confidence in the fix being deployed. Staging (mirror of production) would be a good candidate to deploy and try out such fixes.
  • While it is understandable that production issues might not warn ahead of time, having a contingency plan is super important. E.g. having two web servers vs having one. This way, if one goes down , there is a backup.
  • Communications is the key. Communications internally as well as communication externally (e.g. to the end users or clients). Keeping people in dark is not beneficial here.
  • Trust in each other, trust the process is another key, I feel.
  • Duct tape can solve any integration issues.

PS: Idea for this post came from the podcast I love. Shout out to This Developer’s Life’s Space episode.